The World Designer Tool can only be launched from a World component that exists in a saved scene (so it cannot be used from a prefab asset that exist in the Project Hierarchy).
If your scene is dirty, perhaps because you just Bound the Data Asset to the World, you will need to save it before proceeding. The World Designer Window has a handy button to do this, called Save Scene.
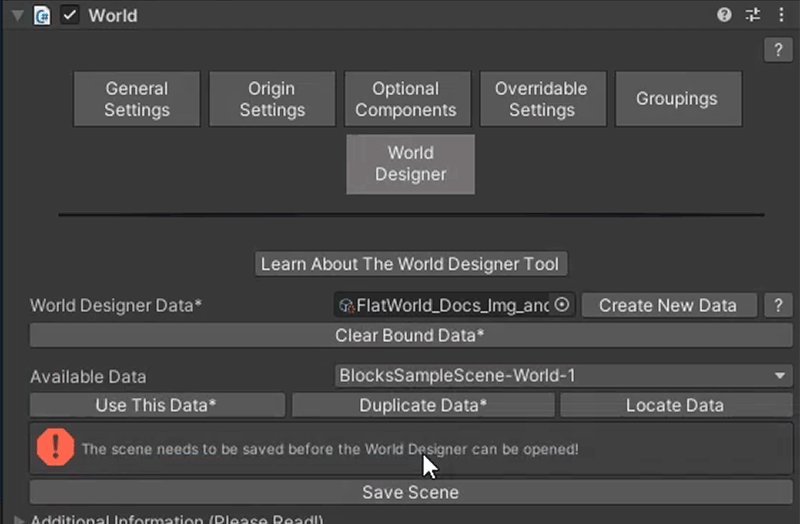
Once you save the scene, a Launch World Designer button should appear.
If it does not, it indicates that there are issues with how the Base Grouping (World Grouping 1) is configured. Grouping 1 must always be configured correctly for the Tool to be launched, so you will need to fix these issues before proceeding.
To identify the issues, press the Why is the Base World Grouping uneditable? Click here to find out! button, which will print a message to the Console Log that details what issues need to be fixed.
Note, you may see the Luanch World Designer button with another button below it, which states Missing World Groupings in the popup above? Click here to find out why!. In this case, you can launch the Tool, but you will be unable to edit or perform advanced operations related to certain misconfigured World Groupings. We advise pressing the button to find out which issues need to be corrected.

You should re-save your existing scene under a new name before proceeding. This is needed because the World Designer Advanced Operations (which will facilitate the scene conversion) are somewhat experimental. If something goes wrong, having a backup will allow you to start over without any loss of data.
After making the backup, you should reload the original scene, navigate back to the World Designer tab of the World Component, and then press the Launch World Designer button to launch the Tool!
While the Origin Position used by the World Designer Tool is taken from the World component, the Origin Cell is not.
It is defined on the World Designer Tool and saved with the World Designer Data, so that you can adjust it without affecting the runtime Origin Cell used by the World.
The Origin Cell chosen will affect where the Asset Chunks associated with each Streamable Cell are loaded in the scene, in addition to which Streamable Cells game objects are assigned to while using some of the Advanced Operations.
As such, it is important that you configure the Cell correctly before starting the scene conversion process, or else the game objects will not be assigned to the correct Cells.
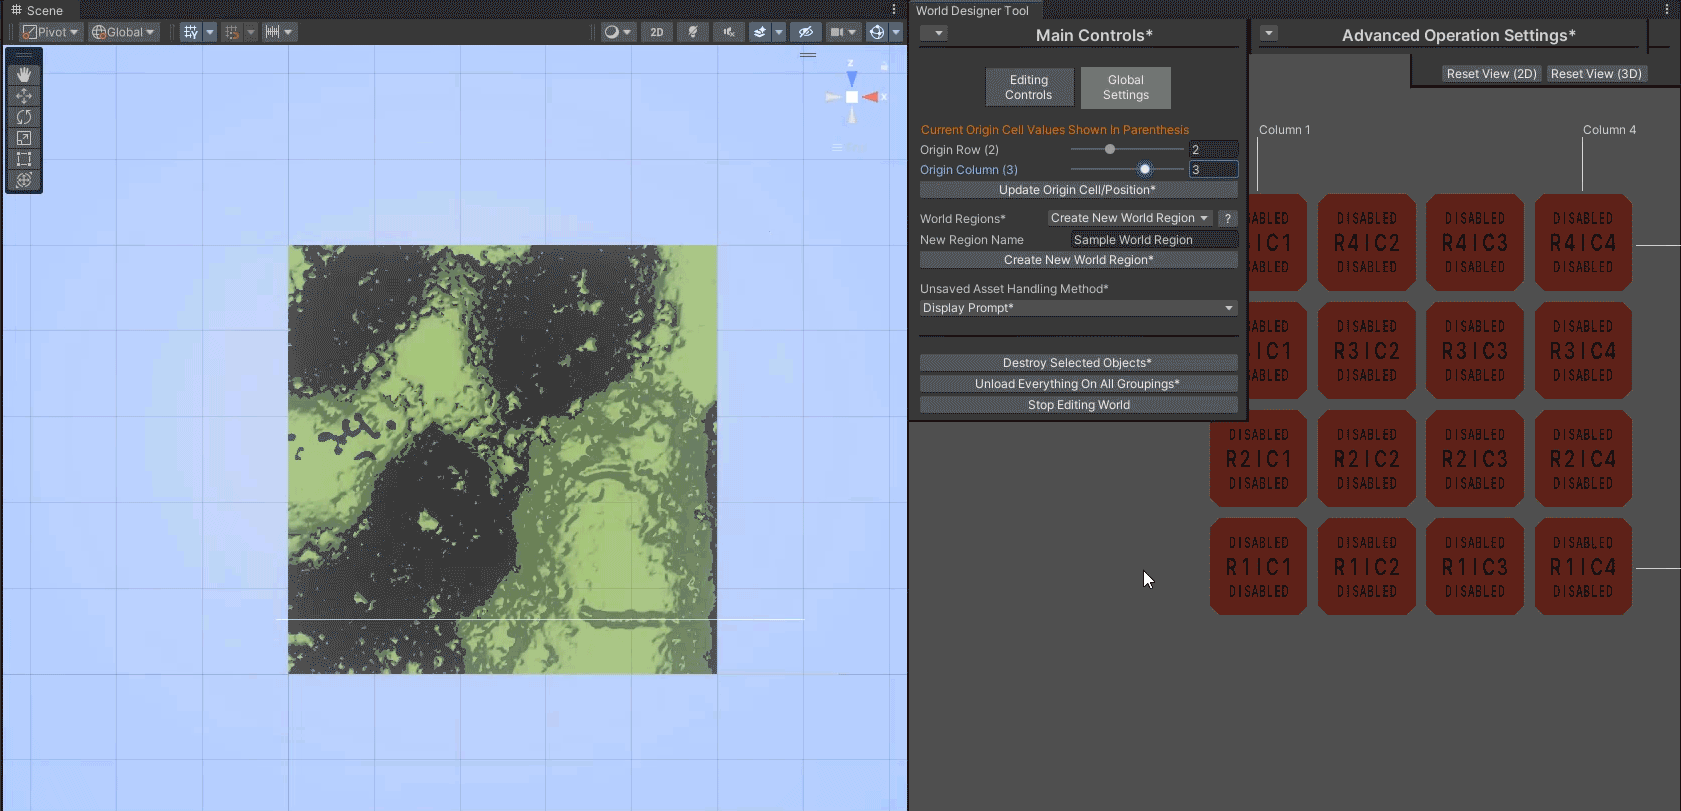
Adjust the Origin Row, Column, or Layer (if the Base Streamable Grid is 3D) using the sliders within the Global Settings Tab of the Main Controls Window, then apply the Origin Cell change by pressing the Update Origin Cell/Position button.
To aid you in identifying the correct Origin Cell and/or Position to use, set the Grouping To Edit (via the Editing Controls Tab) to the one associated with the Streamable Grid you created, and select some of the Cells to the right of the Main Controls window (selection of the bottom left most cell is probably most useful).
When you do this with the Scene View open, selection outlines will show in the Scene View which show you the areas that the Cells occupy in scene space.
You can use this to identify which Streamable Cells your scene's game objects will be assigned to during the conversion process. If the Cells are not to your liking, adjust the Origin Cell until they are. Again, remember that the Origin Cell is in reference to the Base Grouping, though changing it affects all Groupings.
--Choose Carefuly--
While it may be tempting to configure the Origin Cell such that the game objects at or near the minimum point of your scene content will be assigned to Cell R1 | C1 (and Layer 1 if using a 3D Streamable Grid), keep in mind that if you do this, you will not be able to expand your game world in the negative X and Z directions down the road.
In order to avoid this problem and leave yourself room for negative direction expansion, consider setting the Origin Cell to a higher value (the exact number will depend on the size of your cells and how much room you think you might need).
To do this, you may need to adjust the number of rows, columns, and/or layers on your Streamable Grid(s), which will require you to close the World Designer Tool. When doing this, make sure to use the Update (Disable New Cells) button on your Streamable Grid to ensure that all newly added cells are in the correct Disabled state.
--Sample Scene Directions--
If you hover over Cell R1 | C1, you will notice that within the Scene View, the yellow selection indicator will be over Terrain 4 rather than Terrain 1. As stated above, this is because the Origin Cell used by the World Designer Tool is different than the Origin Cell used by the World component. To fix this problem, just like you changed the World's Origin Cell to Row = 2, Column = 2, you should also change the World Designer Tool's Origin Cell to use these same values and then press the Update Origin Cell/Position button.
No matter which Streamable Cell you decide to assign the min point scene content to, you also need to make sure your Streamable Grid has enough rows and columns to fit all of the scene content. To do so, highlight cells (via the World Designer Tool) along the edges of your content, and make sure all content is inside of a Cell.
Note that by default, for performance reasons the World Designer Tool only shows a subset of Cells from your Streamable Grid. You can make this subset larger or change the range of cells that are shown by adjusting the Start and End values found in the Viewable Area tab of the View Controls window. You may need to play around with these settings to properly select the cells along the edges of your scene content!
If some content does not fall within a cell (and is thus outside of the Grids bounds), you will likely need to increase the number of rows, and/or columns, and/or layers used by your Streamable Grid.
If you decide to forego this step, the game objects that falls outside the bounds will be assigned to the nearest Cell on the Grid's border, which will likely not be ideal.
--Sample Scene Directions--
The Streamable Grids have been configured to fully encompasses this Scene's content, so you don't need to worry about that. Something to take note of, however, is that Groupings 3 and 4 only show a sub-set of Cells in the Cell Viewer area. You can adjust the R* End and C* End values (in the View Controls area, Viewable Area tab) to 16 in order to show the full set of Cells.
When viewing Sub Groupings (Groupings 2-4 in this case), you will observe a white outline in the Cell Viewer. These outlines show the outlines of the Cells from the Base Grouping, which can be useful for seeing how sub-grouping Cells compare to the Base Grouping Cells.