
If you don't know already, there are three ways to control what Cells are loaded by Worlds; Active Grids, World Regions, or custom solutions. If you choose to use Active Grids, you cannot get around using Loading Blueprints, so we invite you to explore this Chapter to learn what they are and how they work.
The Loading Pattern is the basic building block that forms Loading Blueprints. In the most generalized terms, a Loading Pattern is simply a collection of Cells that will be loaded given the Player's location. Loading Patterns come in the usual ring based shape that is common to other streaming solutions, or you can define custom shapes that offer maximum flexibility. Loading Patterns may be Cell specific (if Player is in Cell_2_2, load Cell_1_1, Cell 1_2, etc.), or they can be uniform, where the pattern always remains the same but the Cells that fall within that pattern change depending on where the Player is.
Loading Blueprints are simply collections of 1 or more Loading Patterns that paint the entire picture of what is loaded at any given time given the Player's position. There are 5 distinct types of Loading Blueprints:
1) Uniform Ring - Standard Ring Based Pattern that is loaded no matter where the Player is in the World. While this pattern is always used, the loaded cells shift when the Player crosses one of the Inner Area Boundaries.
2) Uniform Custom Shape - A custom pattern defined by you using the Loading Blueprint Editor that is loaded no matter where the Player is in the World. While this pattern is always used, the loaded cells shift when the Player crosses one of the Inner Area Boundaries.
3) Uniform Sectioned - Similar to Uniform Custom Shape, except you can define separate custom shapes for different sections of the Inner Area. Which Pattern is used depends on which Section the Player is in. The Inner Area can only be a single Cell. While the Patterns are the same for all Active Grid Cells, which Cells are loaded changes depending on which Active Grid Cell the Player is in.
4) Non Uniform Ring - Similar to Uniform Ring, except you can optionally define unique Loading Patterns for specific Cells (which correspond to Cells on a Streamable Grid). Cells without unique patterns use a default Loading Pattern.
5) Non Uniform Custom Shape - Similar to Uniform Custom Shape, except you can optionally define unique Loading Patterns for specific Cells (which correspond to Cells on a Streamable Grid). Cells without unique patterns use a default Loading Pattern.
We go into more detail regarding the Blueprint Types in their dedicated Sections within this Chapter.
Loading Blueprint Repositories are Scriptable Assets that store collections of Loading Blueprints. You can define as many Loading Blueprints within a single Repository as you'd like, and you can create as many Repository Assets as you'd like.
By using Repositories, you can change the Loading Blueprint being used by a particular Active Grid Grouping at any time within the game, and that change will persist across game saves. Do keep in mind that an Active Grid can only utilize a single Repository (which CANNOT be changed in-game), however, so your choices of Loading Blueprints is limited to whatever Blueprints are within that Repository.
If you have not already created a Loading Blueprint Repository, we recommend creating one now (details can be found in the next sub-section).
Loading Blueprint Repositories are Scriptable Assets that store collections of Loading Blueprints. You can define as many Loading Blueprints within a single Repository as you'd like, and you can create as many Repository Assets as you'd like.
By using Repositories, you can change the Loading Blueprint being used by a particular Active Grid Grouping at any time within the game, and that change will persist across game saves. Do keep in mind that an Active Grid can only utilize a single Repository (which CANNOT be changed in-game), however, so your choices of Loading Blueprints is limited to whatever Blueprints are within that Repository.
If you have not already created a Loading Blueprint Repository, we recommend creating one now. If you have created a Repository already and created one or more Blueprints, you will notice that the Repositories Inspector list all Blueprints contained within it, showing useful information about each. This information includes:
1) The Index of the Blueprint.
2) The Name of the Blueprint.
3) The Type of the Blueprint [in brackets].
4) The ID of the Blueprint (in parentheses).
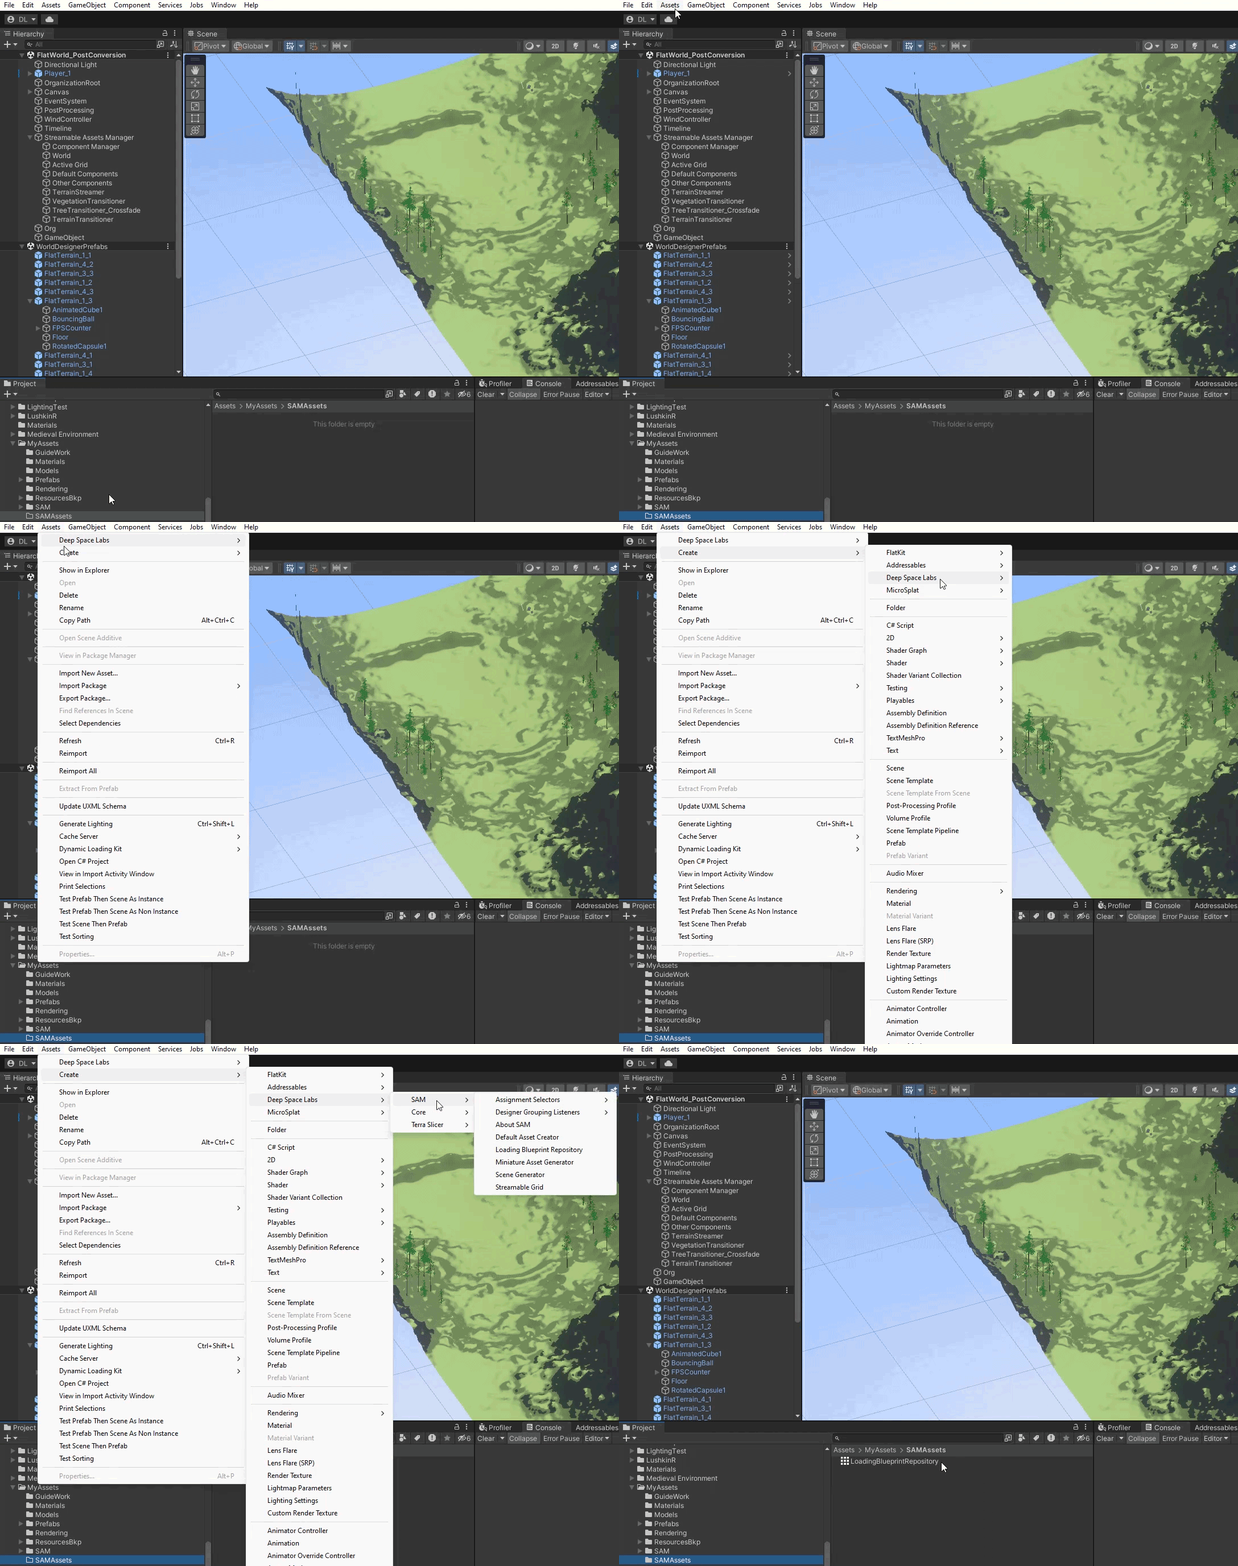
You can create this asset by selecting from the Top Menu Bar:
Assets -> Create -> Deep Space Labs -> SAM -> Loading Blueprint Repository

or by right clicking a folder (or inside a folder) within the Project Hierarchy and selecting from the pop up menu:
Create -> Deep Space Labs -> SAM -> Loading Blueprint Repository

By default this Asset is given the name LoadingBlueprintRepository, however we recommend changing this name to something that will better help you differentiate it with other Loading Blueprint Repository Assets in the future.
At runtime, the Blueprint used by an Active Grid Grouping can be changed using the Blueprint Index, Name, or ID, however we recommend always using the ID, which is assigned to the Blueprint when it is first created and will never change so long as the Blueprint is not removed from the Repository.
The Index is the order of the Blueprint in the Repository, and while this can be used to change a Groupings Blueprint at runtime, it is not recommended, because if you edit the Repository in the future and remove a Blueprint, the Index of all Blueprints after the removed one will be decremented and any code that uses the index will need to be modified.
The name is a more solid identifier than the Index, however using it means you cannot rename blueprints without also modifying any code that uses the names.
The Loading Blueprint Editor is a visual tool that will aid you in the creation of Loading Blueprints. This editor is launched via the Loading Blueprint Repository inspector, so at this time you should create a Repository (using the button above) if you haven't already.
Select your Repository and use the Launch Blueprint Editor button to open the Blueprint Editor.
If this is a new Repository, it will begin with 0 Blueprints, so in order to start using it, you will need to press the Create Loading Blueprint button.
Pressing this button will create a new Blueprint using the Blueprint Template saved within the Global Editor Settings asset. If this is your first time using the Loading Blueprint Editor, the Template will automatically be set to a standard 2D Uniform Ring Blueprint with a single Inner Area Cell and Outer LOD 1 Ring thickness of 1 (forms a 3x3 pattern for a total of 9 Cells).
In the future, you are free to change the Template to any Blueprint you create, which is useful if your game makes use of a specific type of Blueprint more often than not.
The Loading Blueprint Editor consist of 3 distince Control Windows superimposed on top of the Pattern Editor.
Main Controls is where you will find all the settings that change the underlying Blueprint Assets, such as their Type, whether they are 2D or 3D, and the Loading Patterns they use.
Navigation Controls helps you navigate between a Blueprints different Loading Patterns when working on a Blueprint that uses multiple Patterns.
View Controls contain settings affecting the Editors visual components. Here you can add a MiniatureAssetGenerator to change the meshes used by the Pattern Editor to actual mini versions of your in game Asset Chunks, reset the Pattern Editor Camera, and adjust other settings to make the Blueprint Editor more useable for your needs.
Note that while the Main Controls and View Controls Windows have dedicated Sections within this Chapter, information on the Navigation Controls window is only found in the Non Uniform Ring Type and Non Uniform Custom Shape Type Sections, as this Window is mainly used with those Blueprints.
The Pattern Editor is the area that sits under the Controls Windows that shows the current Loading Pattern belonging to whatever Blueprint you are editing. Cells are drawn here representing the Cells in your Pattern, and it contains interactive UI elements for modifying the Pattern in an intuitive way. Selection Based Patterns (Sectioned and Custom Shape) can only be edited using the Pattern Editor. When using Non Uniform Blueprints, the Pattern Editor also shows you which Cells have unique Patterns and which do not, and allows you to add and remove unique patterns.
The Pattern Editor Camera can be manipulated in several ways to aid you in editing Loading Patterns:
1) Scrolling: Hold the Middle Mouse button and move the mouse to scroll the camera in whatever direction you wish. This is very useful for larger Patterns when using a large Viewable Area.
2) Zooming: Rottate the Mouse Wheel button zoom the camera in and out.
2) Rotating: Hold the Right Mouse button and move the mouse to rotate the camera around the Loading Pattern. This is really only useful if the Blueprint is 3D!
You can reset the camera back to its default 2D view using the Reset View (2D) button in the View Controls Window. This view is orthographic to make viewing the current layer of Cells as clear as possible. For 3D Blueprints, you can also use the Reset View (3D) button to reset the camera to an angle optimal for 3D blueuprint editing.
--Special Note--
The gaps you see between the Cells in the Pattern Editor are there as visual aids so that you can more easily differentiate between different Cells. Any gaps you see are not actually present in game between Active Grid or World Cells.
At this time, we recommend continuing with the Main Controls Window Section before exploring any of the Blueprint Type Sections that you are interested in. After, you can continue on with the Sections that follow the Type Sections.