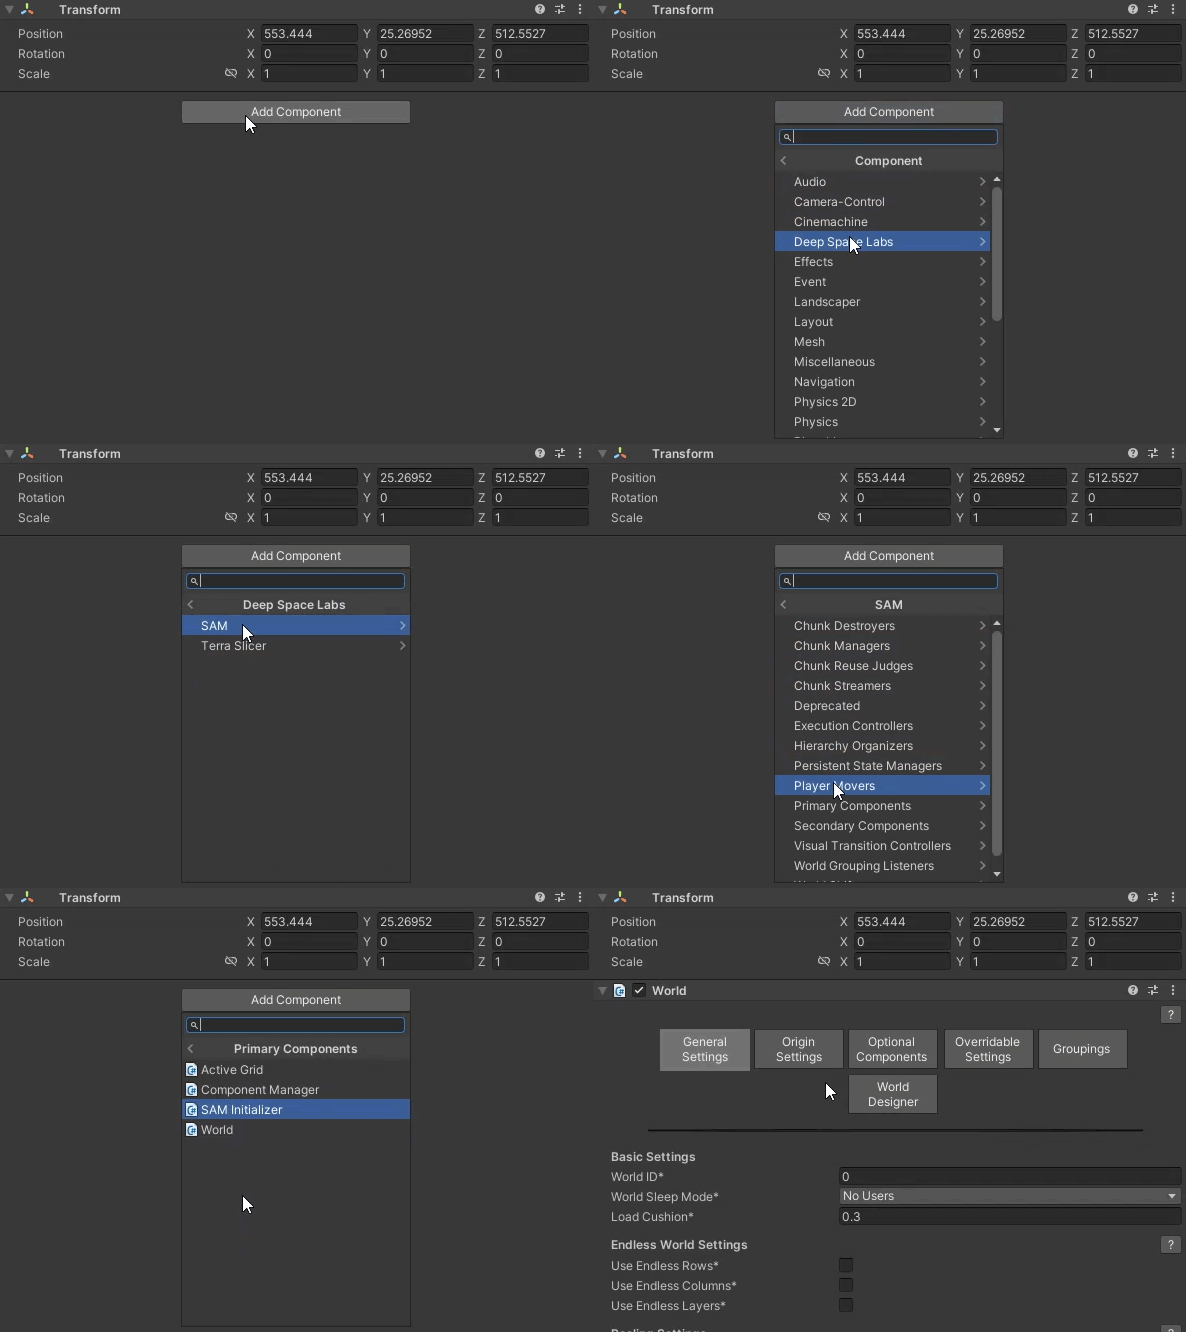

The World component retains the same name within SAM, however you will need to recreate the component using the new Deep Space Labs component creation path. Do note that it is recommended to simply use the game object quick creation option, which will create all basic components you need to get started with SAM.
To do so, simply choose GameObject -> Create Other -> Deep Space Labs -> SAM -> Default SAM Setup, either via the top Unity menu bar or by right clicking in the Scene Hierarchy.
Alternatively, if you want to only create a new World component and nothing else, that information is provided below.
You can add this component by selecting a game object and then selecting from the Top Menu Bar:
Component -> Deep Space Labs -> -> SAM -> Primary Components -> World

or by selecting a game object and using the Add Component menu via its inspector:
Component -> Deep Space Labs -> -> SAM -> Primary Components -> World

The World has probably seen the most changes/improvements of all the components. In this section we will only be going into detail with settings which were on the old World component, so that you can (as quickly as possible) upgrade your old World components.
We will only briefly touch upon some new settings found in the new World, as they are covered in detail within the Worlds Chapter.
This setting remains and is used in the exact same way. Remember, when using multiple Worlds within a scene, each World should utilize a unique ID!
Found within the General Settings window under Basic Settings
This setting remains and is used in the exact same way. Set the value to the same value shown in your old World.
Found within the General Settings window under Basic Settings
These settings have been slightly renamed however the functionality remains the same.
Found within the General Settings window under Repeating World Settings.
These settings remain the same with the same functionality.
Found within the Origin Settings window.
This setting remains the same (Position added to end of label) and has the same functionality.
Found within the Origin Settings window under Origin Positioning Settings.
This setting remains the same and has the same functionality.
Found within the Origin Settings window under Origin Positioning Settings.
This setting's name has changed slightly, however the functionality remains the same.
Found within the Origin Settings window under Origin Cell Change Settings.
Note, the old World performed Origin Cell Changes via a complete Duplication of every object belonging to the World. While the functionality remains, you now have the option to shift the World via a World Shifter component instead, which can intelligently shift the positions of objects belonging to the World rather than duplicating them.
Again, this setting's name has changed slightly, however the functionality remains the same.
Found within the Origin Settings.
Primary Cell Object Sub Controllers are now known as Chunk Managers. There are several different locations within the World's inspector where you can assign Chunk Managers, the first of which will be the likely location where you want to assign yours.
1) The Default Chunk Manager field within the Overridable Settings window.
Any Chunk Manager assigned here is used by every LOD Group on every World Grouping, unless you assign a different Chunk Manager to one of the fields described in option 2 and 3.
2) The Chunk Manager field within a specific World Grouping's Grouping Overrides sub window.
Any Chunk Manager assigned here will override the Default Chunk Manager from option 1 and will be used by all LOD Groups on that specific World Grouping, unless a Chunk Manager is assigned to an LOD Override (described in option 3).
3) The Chunk Manager field within a specific LOD Override.
Any Chunk Manager assigned here will override the Default Chunk Manager and/or Chunk Manager assigned at the World Grouping level, however it will be used only for the LOD Group indicated by the LOD To Apply Override To field.
This system gives you a great deal of flexibility in using different Chunk Managers with different World Groupings or LOD Groups, as you can assign a general purpose Chunk Manager to the Default Chunk Manager field, and only override World Groupings and/or LOD Groups when they require special chunk management.
If you haven't already upgraded your Primary Cell Object Sub Controllers to Chunk Managers, take a look at the Upgrade Section within this Chapter that refers to the specific Primary Cell Object Sub Controller you were previously using, or the Custom Primary Cell Object Sub Controllers Section if you were using a custom Primary Cell Object Sub Controller.
World Grids are now known as Streamable Grids and are assigned on a per World Grouping basis, allowing you to combine multiple Grids on a single World. This system allows you to layer different Asset Groups one on top of the other.
For now, you will likely wish to assign the Streamable Grid you upgraded from your previous World Grid to the Streamable Grid field of the Base World Grouping (Grouping 1), which can be found within the General Settings window of the World Grouping.
If you haven't already upgraded your World Grids to Streamable Grids, take a look at the World Grids Section within this Chapter.
The ability to load cell objects in the editor via the World tool has been removed. You can now achieve this same functionality using the World Designer Tool!
The World Designer tool can be launched via the World Designer window on the World.
Cell Object Loaders are now known as Chunk Streamers. Previously, the Cell Object Loader was assigned to the Primary Cell Object Sub Controller, however with SAM, we have decoupled Chunk Streamers from Chunk Managers.
Now, Chunk Streamers are assigned in exactly the same way that Chunk Managers are assigned to the World, via a Default Chunk Streamer field, via a World Grouping specific override, or via a LOD specific override. You can scroll up to Primary Cell Object Sub Controller -> Chunk Manager for more information on how this works..
For now, you will likely wish to assign the Chunk Streamer you upgraded from your previous Cell Object Loader to the Default Chunk Streamer field, which can be found within the World's Overridable Settings window.
If you haven't already upgraded your Cell Object Loaders to Chunk Streamers, take a look at the Upgrade Section within this Chapter that refers to the specific Cell Object Loader you were previously using, or the Custom Cell Object Loaders Section if you were using a custom Cell Object Loader.
Previously, if you wanted to perform some action when a Asset was loaded, you would need to add a Cell Action to the game object, which would be executed by the World after the Game Object was loaded.
This system has been eliminated and a new system introduced that uses a special components called World Grouping Listeners.
World Grouping Listeners are usually custom created components that can be assigned to 1 or more World Groupings. They are very similar to events in that they allow you to 'listen in' to different events for a particular World Grouping, such as World Cells being added or removed.
World Grouping Listeners are covered in detail in the World Grouping Listeners Chapter.