In this Chapter, we will introduce you to some basic concepts and slowly build an arsenal of assets, game objects, and components that will evolve into a working game world.
This Chapter is meant to serve as an introduction and to facilitate the creation of a working game world as quickly as possible, which means it is not as detailed as it could be. However, if you wish to learn more about a specific feature, component, or asset, we invite you to explore their dedicated Sections or Chapters (assets are typically covered in the Scriptable Assets Chapter).
This chapter is intended to be used with your own pre-existing scene(s), however if you do not currently have any such scenes you can download the Samples Package and use the scene called 5_Pre_SAM_Example_Scene, which can be found in the Assets/Deep Space Labs/SAM/Samples/SampleScenes/BasicConcepts folder.
We will reference this scene as the Sample Scene within this tutorial, and you will find sub-sections and text that says Sample Scene Directions whenever we have instructions that apply to users working through the tutorial using this Sample Scene (these instructions will generally not be found in the Section Instructions, but in the sub-sections that Section Instructions references).
If you are a MicroVerse User, you can use your existing scene or (if you don't have one) the 2x2 Demo scene found in the MicroVerse - Demo package. Just like for the Sample Scene, when MicroVerse specific instructions are called for, we will label them under MicroVerse Directions.
Whichever scene you use, remember that if you want to make a test build with this scene later, you will need to add it to your Build Setting Scenes list!
In each Section of this Chapter (including this one), we provide an ordered list of Section Instructions for you to carry out, with the numbers of each instruction carrying over to the following Section.
Most of these instructions will require you to read some additional information within that Section before you are able to carry them out, in which case the Sub-Section that the information is contained within will be linked to.
In truth, we would advise reading all Sub-Sections in each Section before proceeding to the next Section, however we understand that not all users prefer to take that route.
We only ask that you refer back to this Chapter if you face issues or to check the FAQ Chapter, as it is likely that whatever issue you are facing can be resolved by carefully re-reading this Chapter or by exploring the FAQ. Then, if the issue is still not resolved, use one of the resources provided on the Contact Page to reach out for support.
With all that fuss out of the way, let's proceed with the tutorial!
1) Read the Assets, Streamable Asset Chunks and Streamable Cells Sub-Sections, or watch the S.A.M. General Overview video (which goes over these concepts).
2) Create your first Streamable Grid Scriptable Asset and rename it (The Streamable Grid and Creating A Streamable Grid Asset Sub-Sections).
3) If using the Sample Scene, optionally duplicate this Streamable Grid three times (Sample Scene Directions Sub-Section).
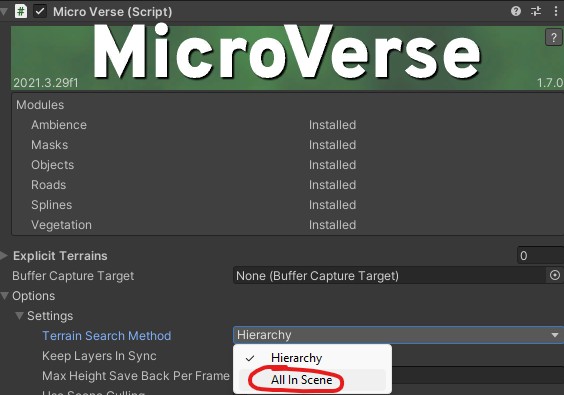
4) If using MicroVerse, change the Terrain Search Method setting on the MicroVerse Component (MicroVerse Instructions Sub-Section).
Return To Section Instructions
Assets are exactly what you'd expect. The individual objects that when combined make up an entire game world.
They can be something small like a tree, plant, or car, or something large like a mountain or Unity Terrain. They can be physical game objects or completely procedural.
While assets are essential to any game, they cannot always be loaded directly by SAM. Instead, they may need to be converted or packed together into a special form known as Streamable Asset Chunks, which serve as SAM's base loadable unit.
Return To Section Instructions
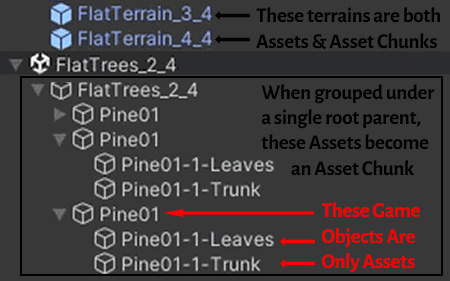
Streamable Asset Chunks are the fundamental building blocks used to construct game worlds with the Streamable Assets Manager. They will usually be game object prefabs or scenes containing a single root game object (with any number of children/grandchildren/etc.), however non-game objects and scenes can also be used (recommended for advanced users familiar with coding only!).
In some cases, an Asset Chunk may be a single asset (such as a Unity Terrain), in which case Asset Chunk and Asset are synonymous. In other cases, your Asset Chunks may contain two, five or even hundreds of assets (stored as children, grandchildren, etc. of the root parent game object).
Return To Section Instructions
A Streamable Cell represents a defined square or cubical space within the game world and is linked with one or more Streamable Asset Chunks. The Chunks do not necessarily need to fit neatly inside of the Cell, however typically they will (at the very least, their positions will usually be inside of the Cell's boundaries).
When the Streamable Asset Manager loads assets, it does so by putting in a call to load a specific Streamable Cell (and LOD, but more on that later). All Streamable Asset Chunks associated with the Cell are then loaded.
For some asset types, a Cell will only ever have one Asset Chunk, such as when using Unity Terrain. Multiple Chunks are advantageous when your game is unable to load a single Chunk in a performant manner.
For example, imagine you have a Cell that contains tree assets. This Cell may contain 1000’s of trees in order to form a dense forest. Loading all 1000 trees in a single load operation would likely introduce a noticeable stutter. In this case, you can split the 1000 trees into multiple Chunks (perhaps with each Chunk only containing 100 trees). Now, instead of one Load Operation, you end up with 10 Load Operations, each small enough not to be noticeable by the player.

--Did You Know?--
The actual loading of assets is asynchronous and typically does not impact performance. In most cases, it is the single frame integration of the assets into main memory that causes issues, as this step is not asynchronous (this is a Unity issue and as such is unavoidable). In certain situations, the activation of the assets can also cause issues, and in either case, using multiple Asset Chunks can help alleviate the problem.
Return To Section Instructions
The Streamable Grid is the first Scriptable Asset you will create in this tutorial. It represents a 2D or 3D Grid Collection of Streamable Cells.
--Upgrade Note--
This asset was formerly known as the World Grid. If you have World Grids in your project that you would like to make use of, please take a look at the section detailing Upgrading World Grids.
Return To Section Instructions
You can create this asset by selecting from the Top Menu Bar:
Assets -> Create -> Deep Space Labs -> SAM -> Streamable Grid

or by right clicking a folder (or inside a folder) within the Project Hierarchy and selecting from the pop up menu:
Create -> Deep Space Labs -> SAM -> Streamable Grid
By default this Asset is given the name StreamableGrid, however we recommend changing this name to something that will better help you differentiate it with other Streamable Grid Assets in the future.
Return To Section Instructions
If using the Sample Scene, this first Streamable Grid will represent the terrains in the scene. You should rename it to indicate that. You can also create three more Streamable Grids at this time (1 for the Large Structures, 1 for the Plants, and 1 for the Small Objects), and work through the next set of instructions for all 4 Streamable Grids at the same time. The easiest way to do this is to simply duplicate the first Streamable Grid 3 times, then change the name of the Streamable Grid asset, as well as the LOD Group Name.
Return To Section Instructions
If using the 2x2 Demo scene (and likely your own scene as well if not using the demo), create two Streamable Grids. The first will represent the Terrain in the demo scene. If using your own scene and you do not use Unity Terrain, the Streamable Grid should represent whatever you are using to form the terrain of your world (likely meshes). The second Streamable Grid will represent the MicroVerse Hierarchy. You should rename both Grids to indicate what they are representing (Terrain_Grid, MVHierarchy_Grid for example).
Note that both MicroVerse and SAM support using multiple Terrains arranged in a tile set. If you are currently using a single Terrain, you have the option to slice that terrain up into smaller tiles. Terra Slicer can help you with this if you have access to it. You are also free to keep using your single Terrain; smaller sized game worlds will typically work fine with just a single terrain.
Later on, we will be moving the terrains out of the MicroVerse hierarchy. In order to ensure they still work with MicroVerse after doing this, it's necessary to make a small change to your MicroVerse component; change the Terrain Search Method from Hierarchy to All In Scene.