
World Grids have been renamed in order to avoid confusion with World related concepts/classes. They are now called Streamable Grids.
While some things remain from the old World Grid class, Streamable Grids bring a great deal of changes and improvements, including LOD Groups, Extra Data, and an easier way to edit the dimensional data of Rows, Columns, and Layers. The most notable of these changes is the addition of LOD Groups. Many settings that were previously set for the whole World Grid are now unique per LOD Group and can be found within the LOD Settings window.
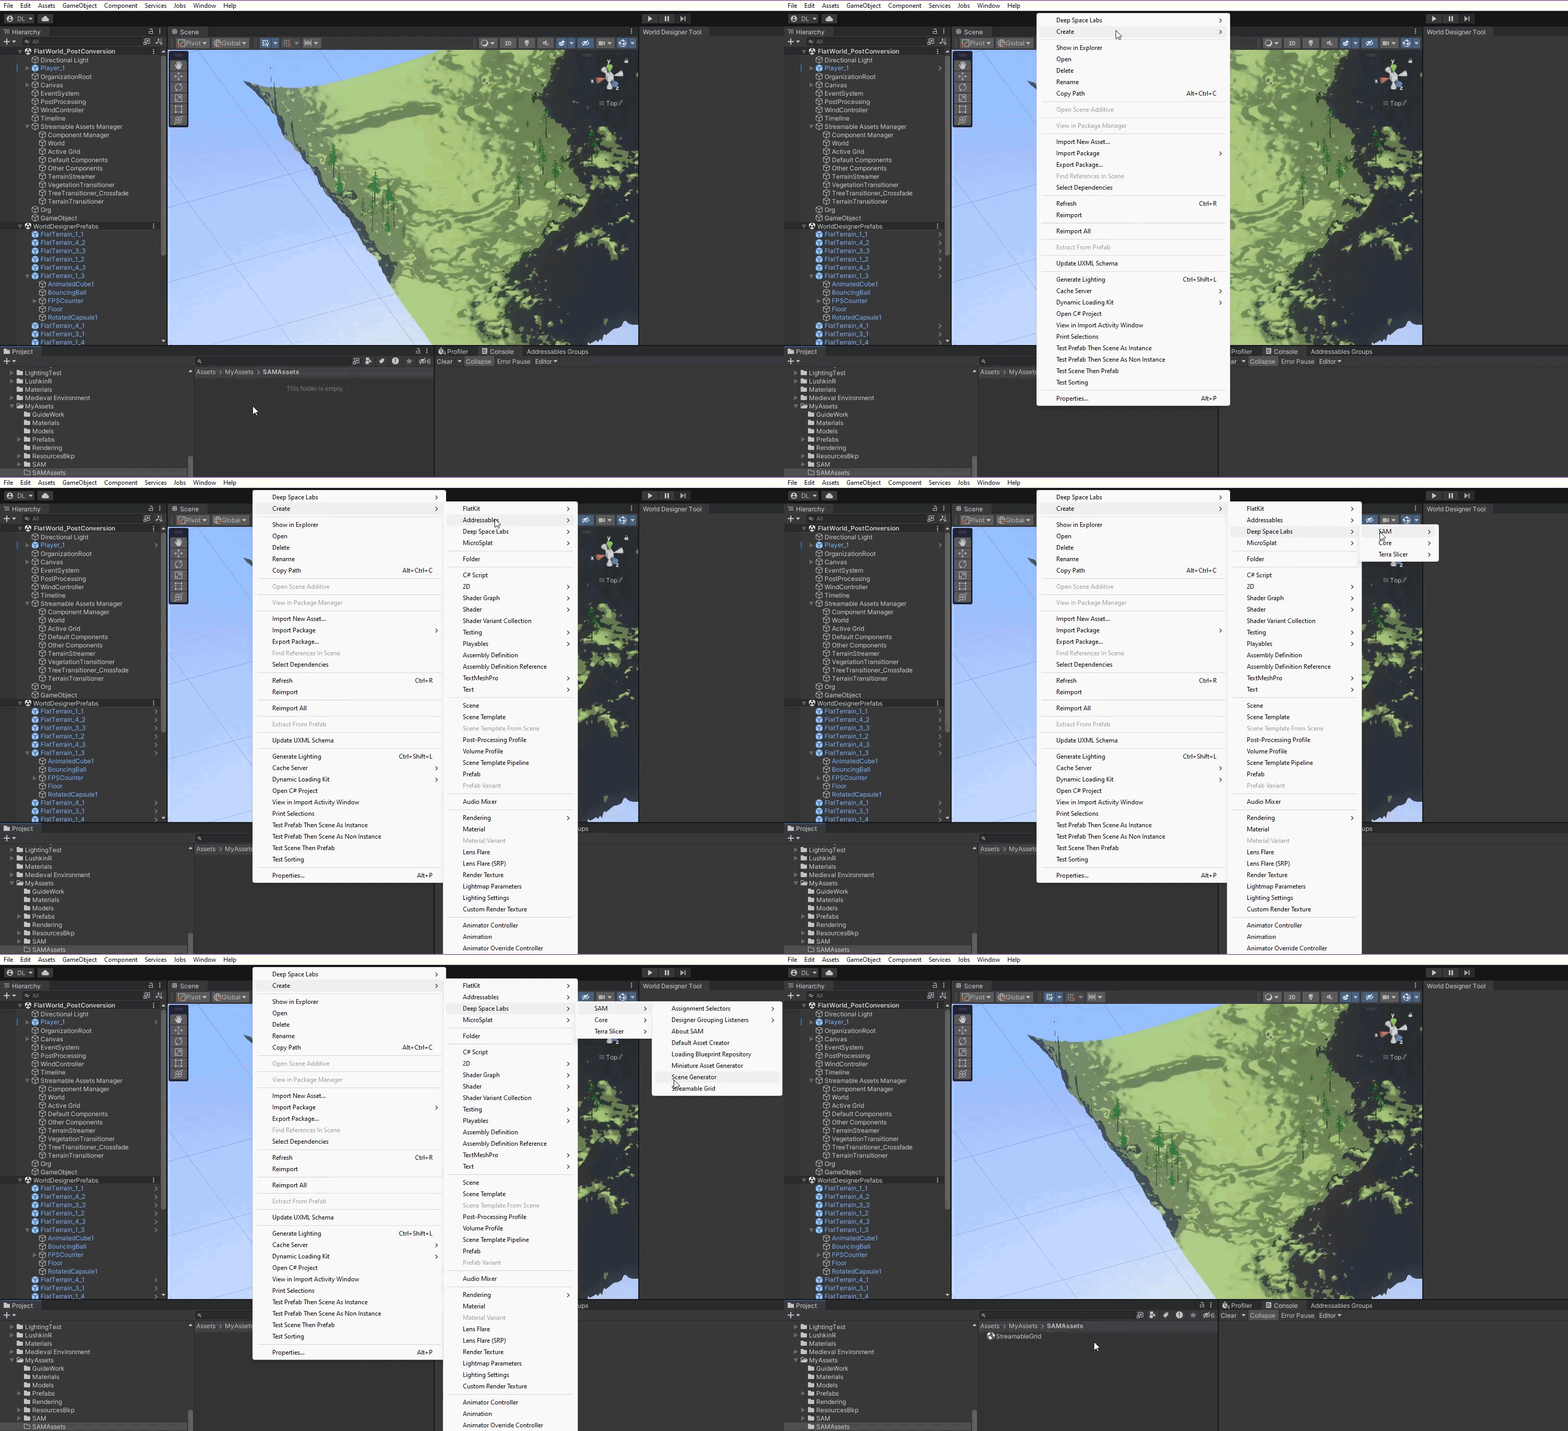
You can create this asset by selecting from the Top Menu Bar:
Assets -> Create -> Deep Space Labs -> SAM -> Streamable Grid

or by right clicking a folder (or inside a folder) within the Project Hierarchy and selecting from the pop up menu:
Create -> Deep Space Labs -> SAM -> Streamable Grid

By default this Asset is given the name StreamableGrid, however we recommend changing this name to something that will better help you differentiate it with other Streamable Grid Assets in the future.
Each LOD Group has a unique Group Name. For now, you will probably only want to use a single LOD Group, so you can copy the Default Group Name from the World Grid over to LOD 1's Group Name field.
Each LOD Group can have a unique Naming Convention asset assigned to it, or you can use the same asset across multiple LOD Groups (or leave the field blank to use the default convention). For now, you will probably only want to use a single LOD Group, so if you have a Naming Convention asset assigned to your World Grid, you can create a new updated Naming Convention based off it and assign it to LOD 1's Naming Convention field.
If you need help with upgrading your Naming Convention asset, take a look at the Naming Convention Section in this Chapter.
Because different LOD Groups can utilize different assets, the Cell Object Type field has been renamed and moved to LOD Settings, where it's known as Chunk Type.
The Unity Terrain option is still available and should be used if that was the Cell Object Type set on your World Grid.
If you had one of the Other options set, you should probably set the Chunk Type to Non Terrain Game Object, unless you are not using game objects, in which case you can set it to Custom Object.
None is for advanced users whose chunks are not traditional C# objects.
Note that previously Unity Terrain could only be used with the Two Dimensional Using XZ Axis type. Now, you can additionally use them with the Three Dimensional type!
The previously named World Type setting is now called Axes, and can be found within the Global Main Settings window. The options you can select remain the same, however there is a bit more freedom in your choice, as Unity Terrain can now be used with the Three Dimensional Axes type! For more information on the differences between using Unity Terrain with the 2D or 3D Axes type, please take a look at the Axes Section within the Streamable Grids Chapter.
Updating the number of rows, columns, or layers can be done within the Global Main Settings window and works more or less the same as before, with two changes:
1) Instead of one button per row/column/layer, there are now two buttons which apply all row/column/layer changes that you have made.
2) These two buttons allow you to control whether newly added Cells are enabled or disabled by default (existing Cells are not affected). This is especially useful for larger Grids.
With the World Grid, you needed to specify which Cells were empty (a red square) and which were not empty (a green square). With the Streamable Grid, Empty Cells are now known as Disabled Cells (still a red square by default) while Non Empty Cells are known as Enabled Cells (a blue square by default). Changing the Designation of a Cell is still done using the Visual Grid, which can be found within the Global Main Settings window. The colors of Disabled and Enabled Cells can be modified via the GlobalEditorSettings asset found in the Assets/Editor Default Resources/Deep Space Labs/SAM/ScriptableAssets folder.
Enabling/Disabling Cells works slightly different than before, with a left click now always enabling cells and a right click disabling cells (the shift key needs to be held down if clicking one of the buttons surrounding the Visual Grid to change multiple Cells at once, such as the RX, CX, or All Rows buttons). You can find more detailed information in the Using The Visual Grid Section from the Streamable Grids Chapter.
Previously, if you wanted to change the dimensions of Rows, Columns, and/or Layers, you needed to use terribly designed UI to do so. On the Streamable Grid, you can use the Visual Grid itself to change the dimensions in a very efficient manner. Simply click (with no keyboard key held down) one of the buttons surrounding the Visual Grid, such as the RX or All Columns (the button names tell you which indices will be affected).
When you do so, a small window will popup allowing you to enter a new value for the indices. Pressing enter confirms the change. You can find more detailed information in the Using The Visual Grid Section from the Streamable Grids Chapter.
The Old Data Set Methods from the World Grid are still present in case these methods work better with your project, allowing you to set the dimensional data using default values, a text asset, or prefabs.
Offsets can now be found within the LOD Settings window and are set on a per LOD Group basis. When using a 2D Axes type, the offsets now include an additional offset field for the unused axis. This value does not denote a % of the Cell's size like the other offset values; instead, it is a raw value. For example, if you set the value to 10 when using a 2D XZ Axes Type, all Asset Chunks's positions will be offset by 10 units from Y Position of the Cell's that they belong to.
There is a lot that is new to World Grids/Streamable Grids. If you have trouble understanding any of these new things, remember that there is a dedicated chapter on Streamable Grids!